
SpeedValve 3
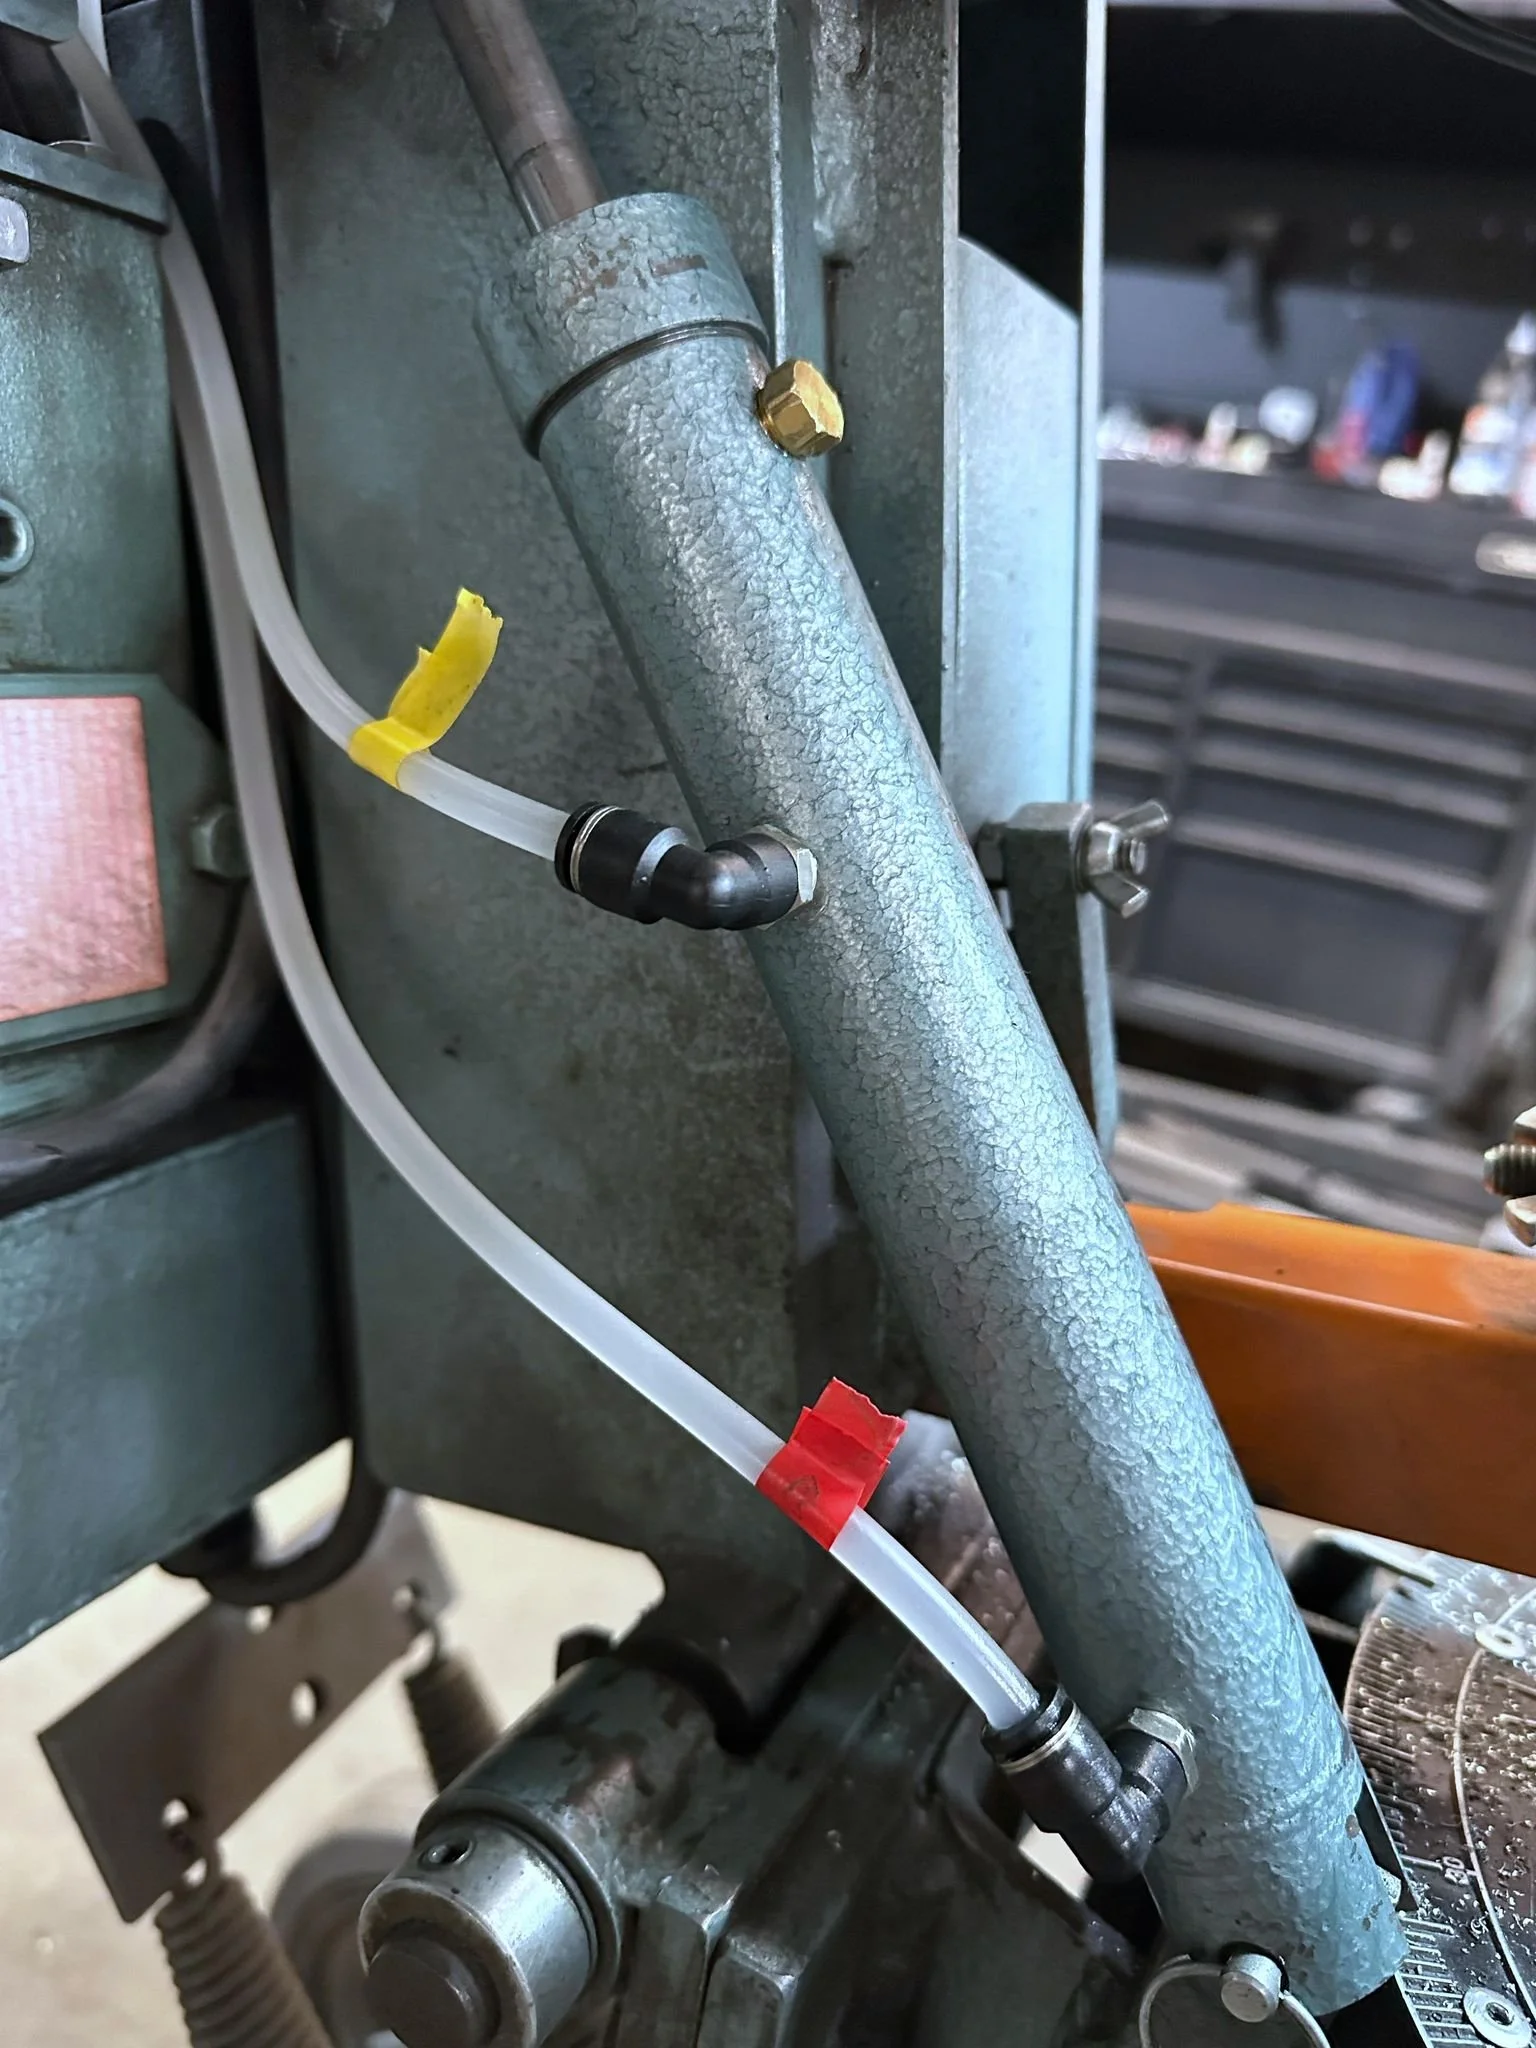
1. Set your bow all the way down. Remove existing Parker needle valve from your cylinder, you can do this by completely loosening the nuts holding the plastic tube. Before attempting to remove the tube use a wrench to turn the needle valve loose and out of the way. Once you’ve done this you can remove the tube then proceed to removing the needle valve and remaining fittings. You will lose most of your fluid so please be sure to have a drain pan ready otherwise most of it will drain into your catch pan. Install two of the provided 90° swivel push to connect fittings into the cylinder. It is crucial that you do not over tighten these fittings. The cylinder wall is thin and there’s not much thread in there. Use discretion!


2. Clamp your new SpeedValve body to the .75”x2” solid bar welded into the top of your bow. Exactly where is entirely up to you. However, I like at the front of this bar. Using a 1/4” transfer punch, mark your mounting hole locations into the .75”x2” bar. Remove your clamp and valve. Use a 13/64 drill bit and drill all the way through, be sure not to hit your wheel and blade on the other side. Now tap the holes for 1/4-20 threads.
3. Mount your SpeedValve using the provided 1/4-20x1-7/8 (gen 2 SpeedValve 1/4-20x1-1/2”) socket head bolts. Tighten until snug.

4. Install the provided 1/8 NPT plug into the center rear hole. Install the snubber into the top rear hole and install one of the provided straight push to connect fitting into the snubber. Then install the last provided straight push to connect fitting into the bottom rear hole. Install all of these using a thread sealant. I prefer LOCTITE 545 but Teflon tape will work as well.

5. Route the provided oil lines through the cable chase covering your OEM power cord (this may require notching the end tab and/or trimming the length down depending on saw model). Connect the bottom fitting of your cylinder to the straight push connect fitting at the back of the Speed Valve. Trim to fit. Now connect the top fitting in your cylinder to the 90° fitting at the bottom of the Speed Valve below the toggle. Trim to fit.


6. Remove the fill plug from your cylinder with the bow all the way down, ensure your needle valve and toggle valve are in the open position. Fill the cylinder with 10w hydraulic fluid until full, replace the plug and tighten. Lift the bow and set it down several times to cycle the fluid, ensuring that you’ve also depressed the momentary valve several times during cycling. Set the bow down again, remove the plug and fill until full again. Replace the plug and tighten until sealed. Do this until you can no longer see air in the lines. Check for any leaks in all fittings and tighten as necessary.

7. Reduce Spring tension on the back of your saw to 12-16 lbs at the head of the bow per your discretion. You can set this by using a fish scale that are cheap on Amazon or just by loosening the knob on the back until it feels comfortable to you.


You are now finished with installing the SpeedValve 3. Enjoy and remember to share that shit on Instagram, Facebook, YouTube, Tiktok or anywhere else you can think of. Hell, write that shit on a bathroom stall somewhere. Just get the word out!
Rapid traverse
1. Fully open both the needle valve and the toggle valve lowering the bow all the way down to relieve pressure in the hydraulic system.
2. Remove the rear push lock fitting and replace it with the supplied 1/8 NPT nipple using thread sealant.
3. Remove the rear mounting bolt from your SpeedValve and loosen the front mounting bolt. Tilt the SpeedValve upwards and tighten the front mounting bolt, leaving the SpeedValve tilted up and secure.
4. With thread sealant, thread the RapidFeed body onto the 1/8 npt nipple until it is tight and inline with the SpeedValve leaving the unthreaded port pointing up.
5. Loosen the SpeedValve front mounting bolt and replacing the rear mounting bolt and snug both. Using a transfer punch mark the RapidFeed body mounting bolt and move the assembly up and out of the way again.
6. Drill and tap new mounting hole for 1/4-20 threads. Using the supplied socket head cap screw replace all three bolts and tighten (For Gen 1 SpeedValve, use the supplied spacer over the bolt behind the Rapid body as your SpeedValve is wider than the RapidFeed valve body).
7. Install the push lock fitting you removed from step 2 into the rear npt port on the RapidFeed valve body using thread sealant.
8. Use general purpose grease on the o-rings of the supplied momentary valve and gently press it into the the top port and install supplied brass tip set screw until snug. If you feel any resistance ont he momentary valve loosen the set screw until resistance goes away.
9. Place the supplied T fitting up to the bottom port of the RapidFeed and eye ball where the lower oil line needs to be trimmed. Cut the oil line and push into the T fitting. Install T fitting into the Rapid lower port.
10. Install oil lines from your cylinder into the push lock fittings (for Gen 1 SpeedValve only, reverse your oil lines so the the bottom line from the cylinder is going into the rear RapidFeed port intot he momentary valve)
11. Make sure all fittings are snug and sealed. Bleed your system by cycling the bow up and down a few times then filling your cylinder. Make sure to depress the momentary valve several times as the bow falls to ensure you’ve relieved the air stuck in it. Repeat until bow stays up in its normal position and until you can no longer see any air bubbles passing through the oil lines. Occasionally, some air may get trapped in the cylinder. I deal with this by lowering the bow and opening your needle and toggle valves, remove the fill plug on the cylinder and fill and let it sit for 5-10 minutes for air to escape from under the piston in the cylinder. Replace plug and cycle bow.
12. The last step will be reducing the spring tension on the back of your saw to 12-15lbs at the head of the bow. Per your discretion.
Line laser
Coming Soon